Eyedropper! Chrome Extension
A dive into the process of creating my first ever Browser Extension! Whew, this one was definitely a challenge to learning Javascript, but I am happy to say that I created an extension that works and especially one that I would use regularly. Read more to learn about the project!
Duration: 4 days
Service: Chrome Browser Extension
Tools: Javascript, HTML, CSS, Chrome Eyedropper API
Overview
Like many Product Designers (and creatives in general), I am obsessed with colors. More often than not, I will be browsing the internet and find that there is a picture, header, or any random page element that contains a beautiful color. I always end up taking a screenshot of this element to copy into Figma to grab it’s hex code, but that is always too much work to do regularly.
What made this process easier to begin with was that us students in HCDE 439 were given an example website to work on as the foundation of our portfolios. This gave me a good idea of what content was required, and actually made me realize to take a look at my personal Product Design portfolio to refresh myself on how I prefer to structure my websites.
This browser extension, “Eyedropper!” allows you to use a color eyedropper to grab the hex code of any element on your screen using the Eyedropper API.
Upon opening the extension and clicking the primary button, the user's cursor changes to an eyedropper. Users can hover over any element on their screen, and when clicked, the hex code of that color appears as well as a preview of that color on the extension's popup menu. To exit the eyedropper, user can select “Esc” or click out of the extension popup menu.
To run this extension, you can clone this eyedropper extension repository and load it as an “unpacked” extension under Google Chrome Extension Management.
Development process
The process of creating this extension could be broken down into the following steps:
1. Playing around with the background color changer example
Javascript is a completely new language to me, and it's not exactly the easiest to learn. To understand the logic and how Javascript interacts with HTML, I found myself playing around with the initial background color changer extension. This allowed me to feel more comfortable and understand the concepts surrounding DOM.
2. Reading through API Documentation
Since I was going to be working with an existing API, I needed to understand what methods I needed to pass in order to get my extension to work. Fortunately, the documentation surrounding the Eyedropper API was extensive, in which I learned that in order to open the interface, I needed to make the call, “open()” in my Javascript file.
3. Working on the HTML/CSS
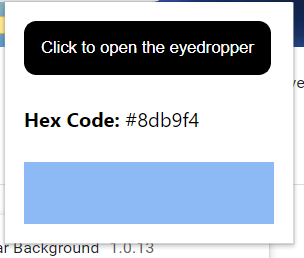
After reading through the documentation, I felt more confident in visualizing what this extension would look like. I started working on the interface of the extension popup, where I knew it was important to show the color as well as it's hex code in the menu. From time to time, the content of the popup menu would change, in which the next image shows my first iteration.

4. Playing around with Javascript
Once I had finally decided on an interface, I began the most challenging part of the project: implementing the logic with Javascript. Like I had mentioned before, I had never really learned Javascript, so I looked to examples of extensions and other websites that had used the Eyedropper API to get a better sense of how I would craft my extension’s logic. This step consisted of a lot of saving and reloading my extension, but it all came into place! Here’s an image of the final interface after implementing the Javascript correctly.
Issue Deep Dive
Unfortunately, I dove into this project a lot later than expected because I got very sick during week 2 and missed some of the foundational content on Javascript. When it eventually came to writing out the Javascript for my extension, I found myself questioning, “what is the difference between a content.js and a popup.js?” While it was a challenge to understand the foundations, I found that learning through javascript.info and reading through W3 Schools resources helped me gain a better grasp of working with Javascript and HTML.
A particular issue that stemmed from this lack of understanding was the issue of the hex code nor the color preview changing. Something that had greatly helped was the message that was shown where the hex code was supposed to appear, as it reminded me to look into the Eyedropper API documentation.
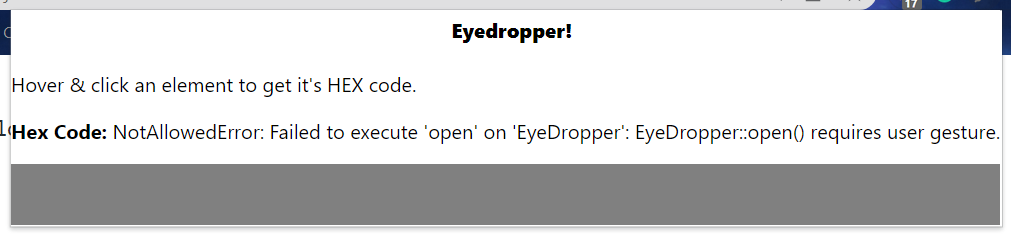
From the issue in this image, I found that I needed to add some sort of button, or “gesture” to interact with in order for the interface to appear. By adding a button into my HTML and adding an Event listener for the button click, the extension worked!
Ideas and Future Work
Looking ahead, I definitely want to add more to this extension to really personalize it into a tool for my designer toolkit. Some things that come to mind that I might add include:
- Adding the CYMP/RGB values in addition to the HEX code
- Copying the hex code upon selection
- Creating some sort of history of all of the colors that were previously selected
Kudos
I definitely wouldn’t have been able to create this extension without the following resources:
- Eyedropper API Demos
- Eyedropper API Documentation
- javascript.info
- TA Raina - Thank you for helping me figure out how to get started!